Are you prepared to unleash the real power of automation? In this article, we’ll teach you how to use an API to link Power Automate and Chat GPT. In the previous post, we have already discussed UiPath and ChatGPT Integration. This Tutorial is going to be very exciting. Here we will give you a complete guide with detailed steps on how to integrate these. We are Using API to integrate between them.
Before going straight to integration, Let’s understand some basic concepts regarding Power automation and ChatGPT. You can also refer to our previous integration with UiPath and Power Automate.
What is Power Automate
Power Automate is one of the RPA Tools which is widely used like UiPath, Automation Anywhere, Blue Prism, etc. Power Automate is powered by Microsoft. Like other RPA tools, this one also helps you to automate repetitive and tedious tasks. Here with the help of API, we will integrate this with ChatGPT which is a GPT-3 model. It is very trending these days. Power Automate also provide various integration with other applications. Like UiPath it also provides a user-friendly user-face interface for users.
Table of Contents
What is ChatGPT
Chat GPT is one of the most trending topics nowadays. We know without knowing the chatgpt you will never reach here. Still, we will provide a summary for ChatGPT.
ChatGPT is an AI model which uses GPT-3. Its features and capabilities are beyond human understanding. It is not just a tool, it can understand your query and respond according to it. Chat GPT is a text-based model which can generate text, which means it cannot give you an image if you are asking for it.
ChatGPT is provided by OpenAI, and with the help of API provided by OpenAi we will integrate ChatGPT and Power Automate. Here we will request a query and it will be processed with the help of API and respond according to the user query.
How to Integrate Power Automate and Chat GPT

As now you have some basic idea about both of these, now we will check how you can integrate them. So that you can directly use ChatGPT in Power Automate with help of API. We will provide a complete guide on this integration, you just need to follow these steps without any errors. The integration method is similar to UiPath and Chat GPT integration.
Here we have created a Dialog box for users to enter questions and at the end a message box with the response or answer from ChatGPT which is provided with help of API. Let’s check how this actually works.
1. Generate API Keys
Before going to API generating, Make sure to have the below requirements which is a basic requirements for this integration. Without this integration is not possible.
- A Power Automate Application Installed on your System
- A ChatGPT Account
Once you have these, you can follow the below steps to generate API keys for your integration.
- To Generate API Keys for integration, Go to OpenAI API, then log in or create an account in it.
- Now on the right side, you can see your profile icon, Click on it and a drop-down will open. Click on “View API Keys“
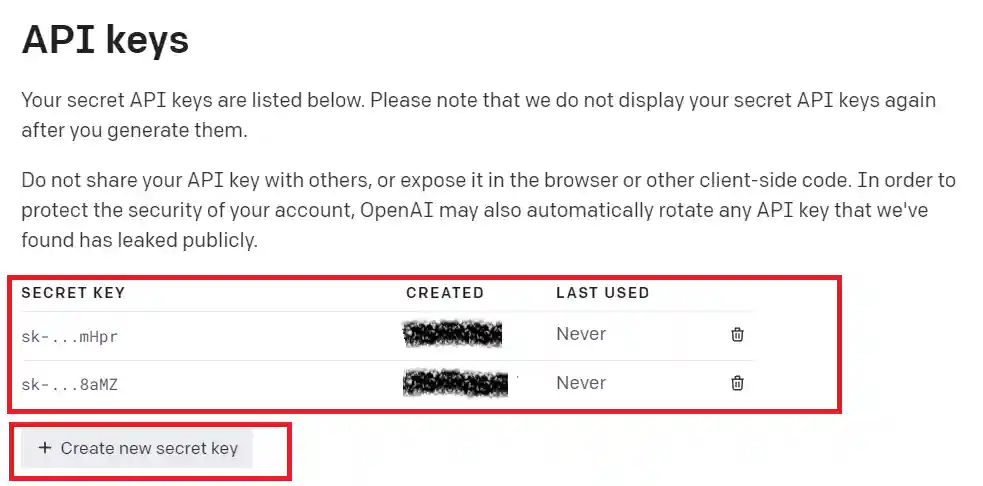
- Now you can see API Keys. Click on “Create new secret key” to generate API keys and copy them. The copied API key will be used in the power automate Software.
2. Integrate API Key to Power Automate
Now we will check how you can add the generated API to the Power Automate workflow. You need to follow the below steps:
- Open your Power Automate software on your system. Now create a new project or you can use the existing one.
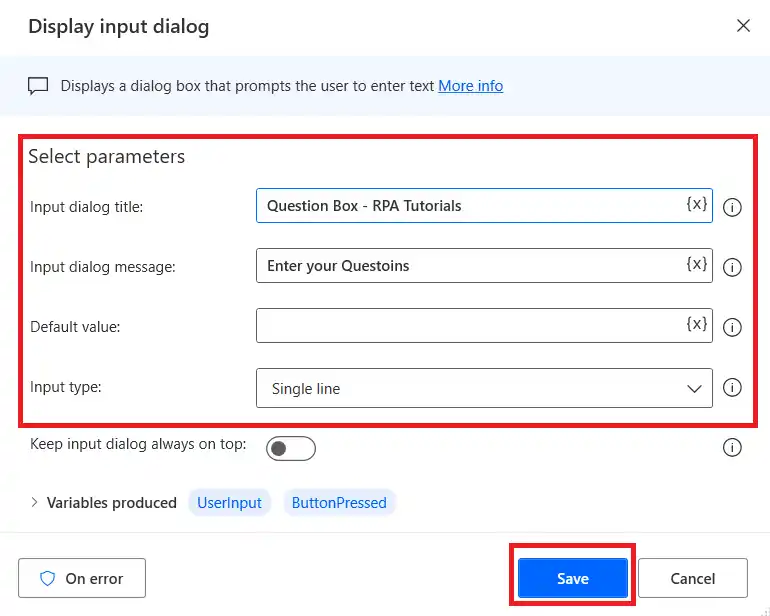
- Now drag and drop a “Display Input Dialog” Activity to your workflow. Give a title and message. Don’t change the variables keep “UserInput“, which is a default variable. You don’t need to do anything.
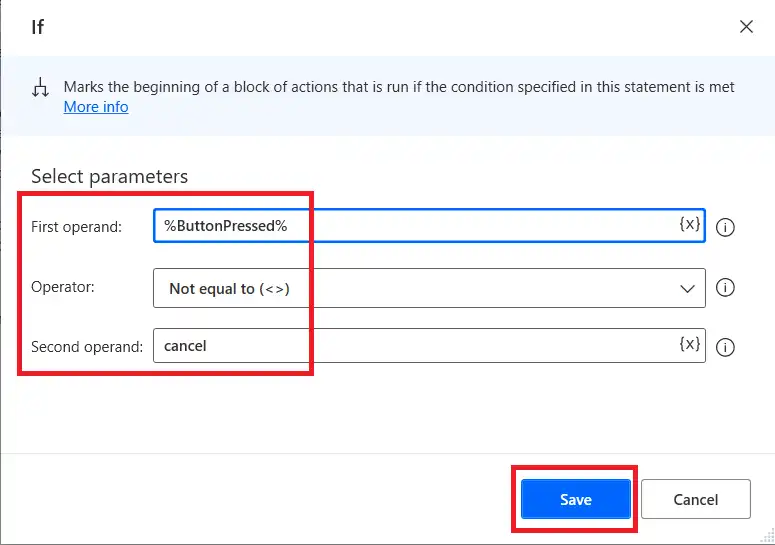
- Now You have to add an “If Activity“. If the activity checks for a particular condition if its true then execute or if it’s false it exits from the if loop. Here we are using it to check whether the user entered some query in the Input dialog box and pressed “OK“.
- So if the user has entered some query and pressed “OK” then the IF condition is satisfied. To check it we are using “%ButtonPressed%” to check whether the button is pressed or not
- If the user press cancels it will exit from the IF loop and stops execution.
- Now you have to add the “Invoke Web Services” activity to your workflow. After inserting a popup will show to fill the values in invoke web services. Fill each with appropriate values:
- URL: https://api.openai.com/v1/completions
- Method: POST
- Accept: application/json
- Content-Type: application/json
- Custom header: Authorization: Bearer <your API Key>.
- Example: Authorization: Bearer AsweradfasaBafasdsfa. After Bearer is your API Key generated which is generated and copied earlier.
- Request body: Enter the below code in it:
{
"model": "text-davinci-003",
"prompt": "%UserInput%",
"max_tokens": 500,
"temperature": 0,
"top_p": 1,
"n": 1,
"stream": false,
"logprobs": null,
"stop": null
}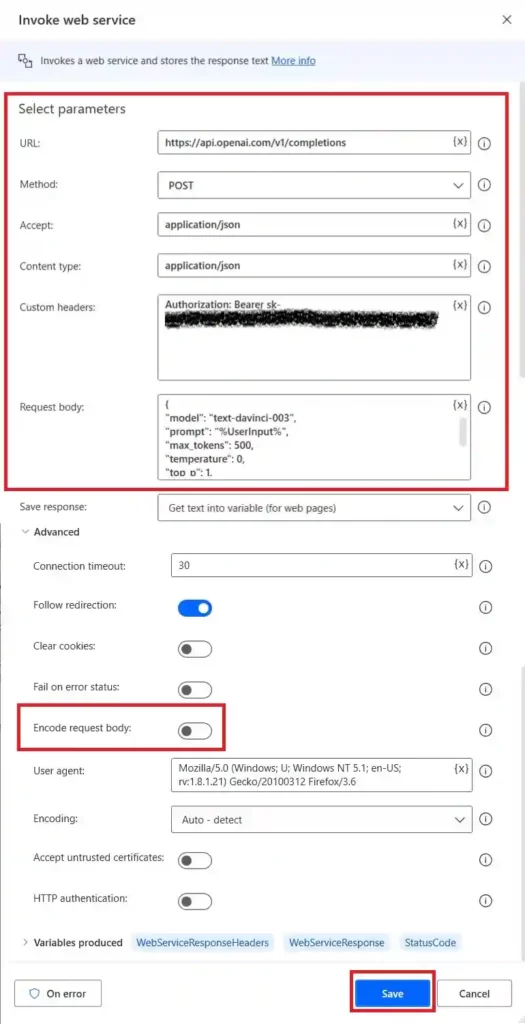
- In Invoke Web Service activity disable “Encode Request Body“. Then click on save to save all changes. You can expect an error if you forget to turn this off while running your workflow.
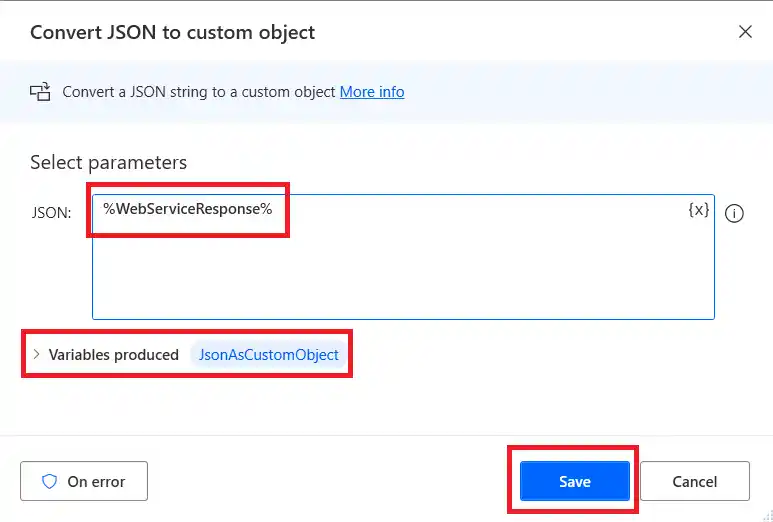
- Now Drag and Drop the “Convert JSON to Custom Object” activity. in the text box add values: %WebServiceResponse%. Don’t change the default variable JsonAsCustomObject. Now press the saves button to save. This is mainly done because when we use API to request a query it mainly will be in the format of JSON. which is not user-friendly, so we use this activity to change to a normal or readable form.
- Now we have to show the answer or request query to the user. To display it we use another “Display Message” activity. Drag and drop this activity into your workflow. Enter the appropriate title for your message box. In the “Message to Display,” box add the below code. Please make sure not to change the default variables.
Your Question is : %UserInput%

Answer: %JsonAsCustomObject['choices'][0].text%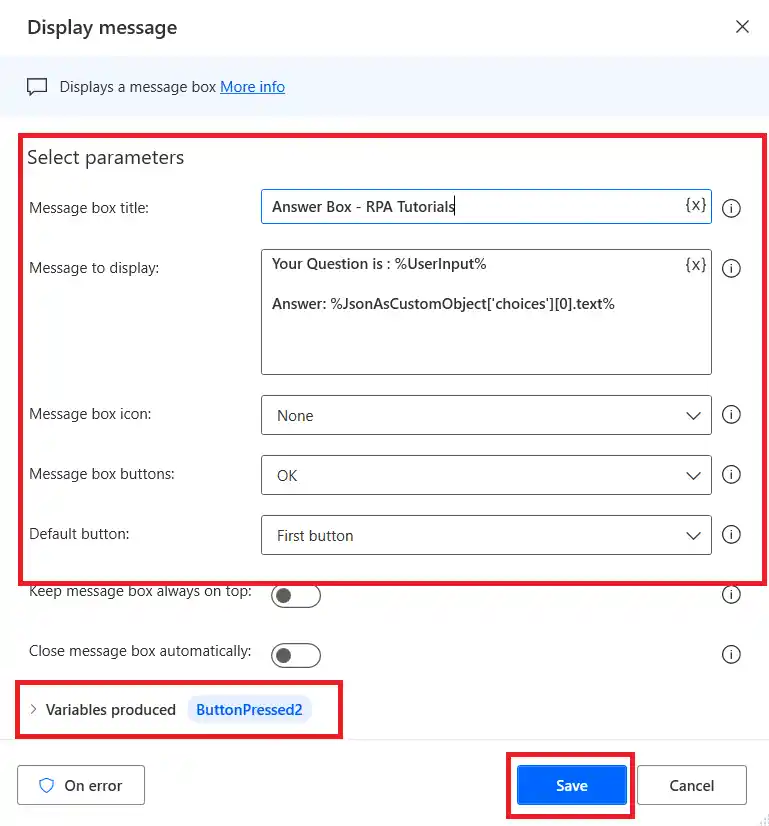
- Make sure that from step 4 to step 9 all activities are inside IF Loop.
- Now we have completed all the procedures for this integration. Save and run the workflow. Once you have run this workflow you will be asked to enter a question and the answer for it will be provided by the Chat GPT with help of API Key
3. Output of Power Automate and ChatGPT Integration
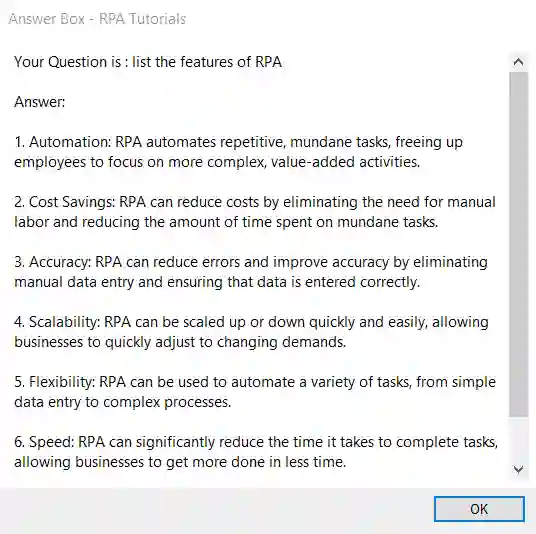
Once you executed the file or your workflow, firstly you will see a dialog box asking you to enter the question which you wish. You have to enter the question in that box and press “ok“. If you press “cancel” below if loop will not execute and it will exit or stop running your workflow.

Once you have entered a question, it will be passed to chat gpt using invoke web service activity with help of the API. Here we are using the POST method to pass the request. The API will request the solution for your query and the answer will be fetched. This answer will be displayed in the message box.
We have completed the integration part successfully. If you have any doubts you can refer to the below workflow image.
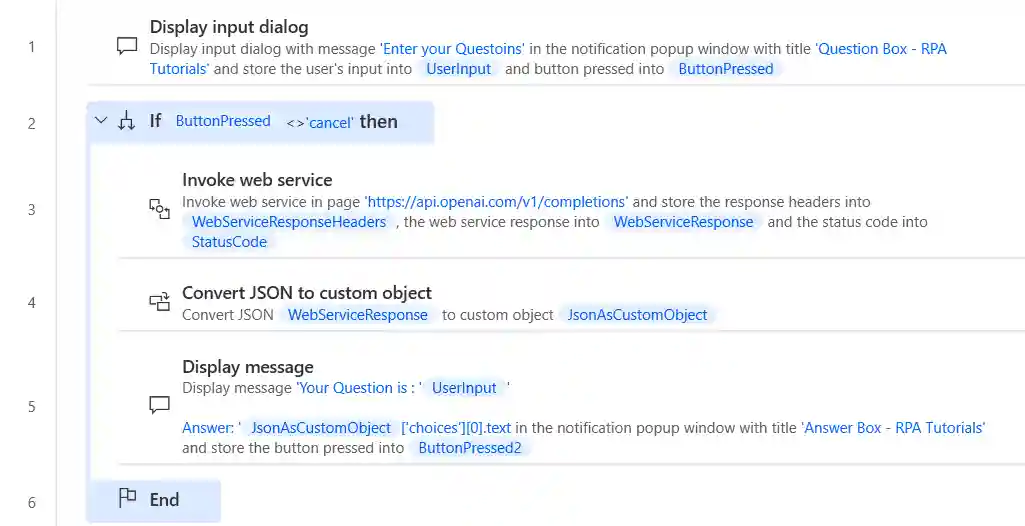
If you have any doubt while integrationg, you can refer the workflow provided about.
Conclusion
We have completed the Integration between Power Automate and ChatGPT with help of the API key. We have used the POST method for this integration. Here we have just shown a sample of how you can integrate, you can use the same method to integrate into other use cases.
Overall, Power Automate and Chat GPT are excellent choices for businesses trying to improve their workflow operations and client interactions.
Faq on Power Automate and Chat GPT Integration
How do I generate API keys for Power Automate and Chat GPT Integration?
To generate API keys for integration, follow these steps. Go to OpenAI API and sign in or establish an account. Now, on the right side, you should see your profile icon. Click on it to reveal a drop-down menu. Select u0022View API Keysu0022 from the drop-down menu. API Keys are now visible. Click u0022Create new secret keyu0022 to create and copy API keys.
How do I integrate ChatGPT API Key to Power Automate?
Open the Power Automate program on your computer to incorporate an API key. Use an existing project or start a new one. Add a u0022Display Input Dialogu0022 activity by dragging it into your workflow. Incorporate an u0022If Activityu0022 and an u0022Invoke Web Servicesu0022 activity into your workflow afterward. Fill in the proper URL, Method, Accept, Headers, and Body values for the respective web services.
