Have you ever encountered an error or exception while running a UiPath workflow? If so, you are aware of how annoying it may be when unknown problems cause your automated process to be disrupted. To solve these issues UiPath provides a Try Catch UiPath activity to help you handle these errors.
In this article, we will be going through this activity to know more and to show how you can implement it on your UiPath Studio.
Table of Contents
What is Try Catch UiPath Activity?
UiPath Try Catch activity is one of the features that uipath provides. This activity is used to handle or manage errors in the UiPath studio.
It helps you to choose how to react or what to do when an exception occurred during your process running so that with the help you are able to resolve it easily without affecting your process. It also helps to prevent the UiPath Bots or Robots from Stopping or Breaking in the case an exception occurs. The package used in this activity is:
System.Activities.Statements.TryCatchThis activity is divided into 3 parts:
- Try: contains the action that could cause an exception.
- Catches: indicates the exception type and, if desired, performs an activity to notify the user of the discovered exception;
- Finally: contains a procedure that ought to be carried out only in the absence of errors or after they have previously been detected.
The “try block” is used to test whether the activities inside it work properly. If an activity causes an error within the try block, it is caught by the “catch block”. The “finally block” always executes, even if an error occurs in the catch block.
How to Use Try Catch in UiPath With Example
Now you have a basic idea of try-catch, now will be going through how you can use this in your process with help of examples.
- Open your uipath studio on your system and create a new process.
- Now search for the “Try Catch” activity and add it to your workflow.

Various uipath try catch exception types are:
| Exceptions | Description |
|---|---|
| System.Exception | It includes All exceptions |
| System.ArgumentException | This exception triggers one argument that is not available or not created. |
| System.NullReferenceException | When the referenced object is null, this specific exception occurs. |
| System.IO.IOException | This occurs when an I/O error occurs |
| System.InvalidOperationException | This exception is triggered when an Invalid method call exception |
| System.IndexOutOfRangeException | It occurs when accessing the values out of the index. |
| SelectorNotFoundException | This type of exception occurs when UiPath selectors are not found |
| BusinessRuleException | It occurs in Business exceptions. |
The above table shows UiPath Try catch all exceptions types.
Example for Using Try Catch UiPath Activity:
Based on the above we will provide an example for anyone with the exception mentioned above. To demonstrate an example here we are using “System.ArgumentException“.
This exception occurs when an argument that is trying to access is not available or not created. To practice, this exception follows the below steps.
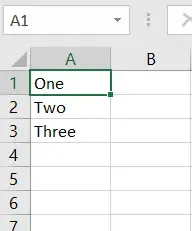
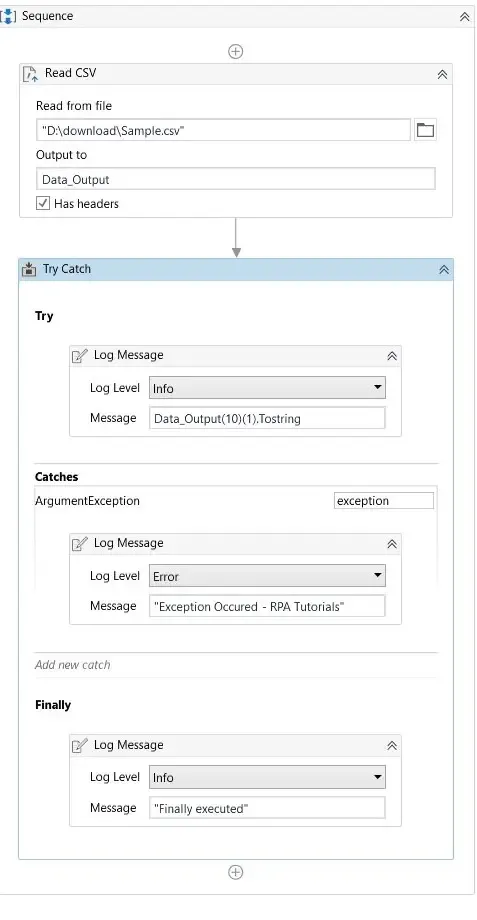
- Drag and drop the “Use CSV” Activity to your workflow. Add the file path of your CSV file and set the output as “Data_Output“. The values in the CSV files are:

- We have added the output argument of the above CSV file as “Data_Output” but have not declared it. So there is a chance to occur an error while execution.
- Now drag and drop a “try-catch” activity to your workflow. Now we have to configure it.

- Now you have to run it and in the output section, you can see this output.

After executing this you can see that an “Argument error” occurred due to the undeclaration of “Data_Output”.
Properties of UiPath Try Catch Activity
| Properties | Description |
|---|---|
| DisplayName | It gives information about the name of the activity. |
| Misc | Misc provides private options. |
Best practices for UiPathTry Catch activity
The layout and workflow of your automation process will determine the best approach to employ the Try-Catch activity. You may, however, prevent frequent errors by adhering to recommended practices. Here are some best practices for using Try catch:
1. How to throw an exception in UiPath
Both business & system exceptions can be thrown in UiPath to signal when an issue has come across in your RPA process.
Eg: New BusinessRuleException(“Enter You message here”)
Eg: New System.IO.FileNotFoundException(“file not found Error”)
2. Try to avoid nested Try Catch uipath
It is more difficult to manage your try-catch activity when you implement nested Try-Catch activities. Also, it makes it difficult to maintain or make modifications to your project’s code, which is not acceptable.
3. Use Try Catch for Specific Exceptions
It is better to use specific exceptions such as System.ArgumentException, SelectorNotFoundException and etc. By doing so, you’ll be able to decide what to do based on the particular exception. It helps you to throw exceptions according to your needs.
4. Most Specific Exception is Caught First
Keep in mind that the most particular exception will always be matched first by the Catches.
Conclusion
In UiPath Studio, It is the best way for handling exceptions. In UiPath Studio, Exceptions can happen at any time while running the process, and the important part is how they are properly handled. As it can help your process to be successful.
By using this activity, you may ensure a safe and consistent automated process. Don’t forget that efficient exception handling is essential for the success of any automation Process.
Also check, UiPath
Faq on UiPath Try Catch Exception Handling
-
How to use try catch in uipath
To use try catch in UiPath, Drag and drop the u0022Try Catchu0022 activity to your workflow. Then, place the activities you want to execute inside the u0022Tryu0022 block. If an exception occurs during the execution of the u0022Tryu0022 block, UiPath will move to the u0022Catchu0022 block and execute the actions you have specified to handle the error
-
How to remove try catch in uipath
To remove try catch uipath h, you have to right-click on the activity and select delete.
