In this blog, we are going to discuss UiPath Attach Browser Activity. Here you can learn about this activity and how this activity actually works with a detailed example. Also, we have included a comparison of Attach Browser and Attach Window Activity, which is a confusing question for UiPath Learners.
Before going through this activity in detail, you should have a knowledge of the following UiPath topics:
- UiPath Studio
- UiPath Studio Installation
- UiPath Activities ( Classic & Modern)
What is UiPath Attach Browser Activity

From the name itself, you can understand what this activity is about, Attach Window Activity is one of the activities in UiPath Studio which are used to attach or select a browser application that is already opened on your system. This activity is automatically generated if you are using a “web recorder”.
This activity comes under the classic activities. So to use this activity in your studio you should enable classic activities.
This activity is used when you have to perform multiple automation on the website which required a browser to open. You can use this activity in web scraping, data entry, or form filling in different websites.
Table of Contents
How to Use Attach Window in UiPath Studio
Now you can learn how to use this activity in your studio with examples for various applications as I mentioned earlier. Before using this activity you have to switch to classic activities. After switching or enabling classic activities you need to follow these steps:
- Open your UiPath Studio Application on your system and create a project.
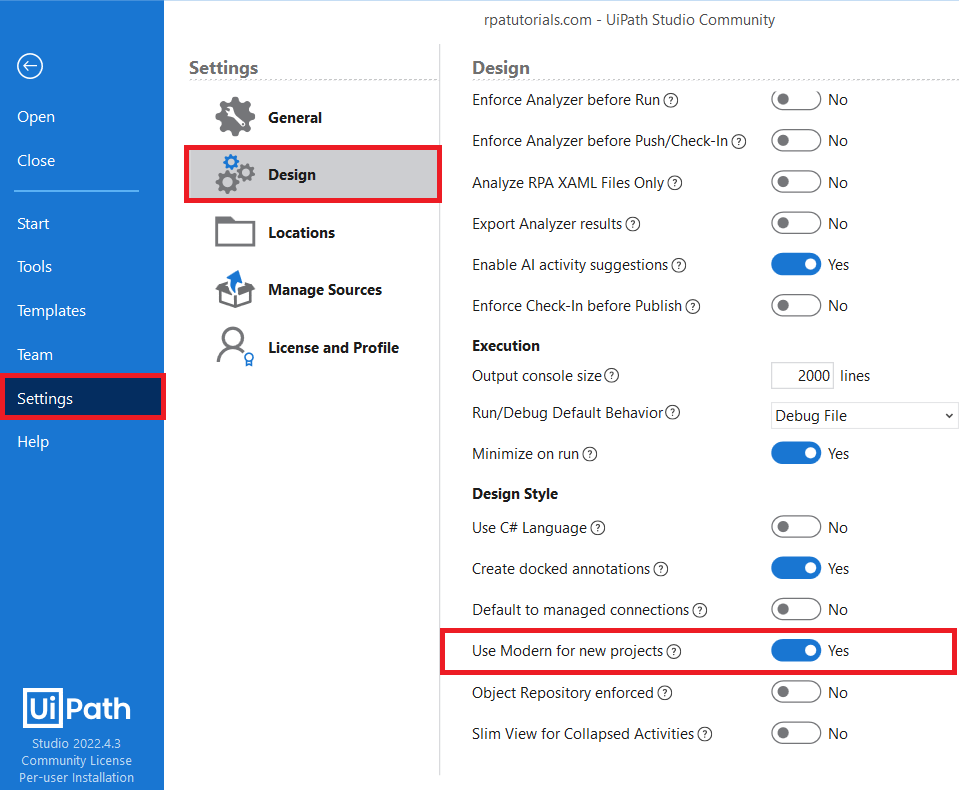
- Then go to the “setting” tab, and click on the “Design” tab.
- In the design tab at the bottom you can see “Use Modern for new Project“, Turn this off. To do that you can refer, to how to enable classic activities in uipath.
- Now we will use attach window activity in your studio. To use, you will need a “sequence” activity. Drag and drop the sequence activity to use it.
- now to select this activity, on the search bar type “attach browser” and either drag and drop or double click into the sequence activity which have been added in the previous step.
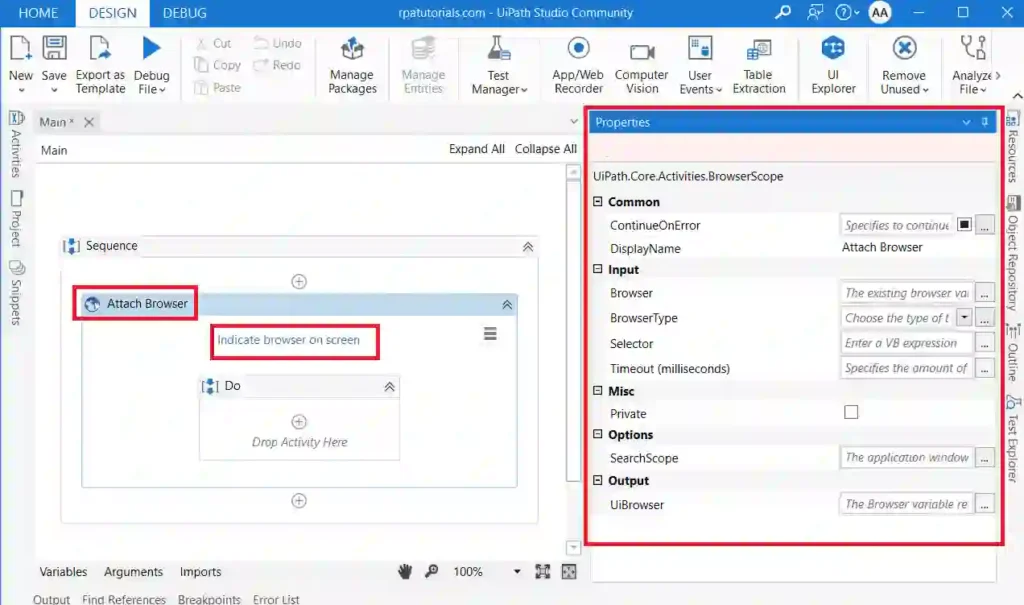
- To select your browser click on “indicate browser on-screen“, then select the browser which you want to select. you can see a green area to select your browser. In the below image, I have selected the chrome browser.
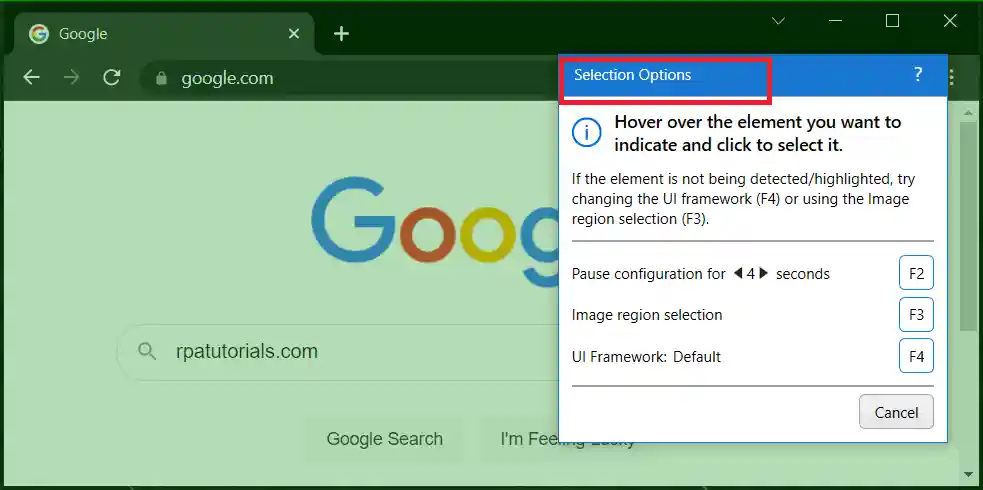
- Once you have selected your browser you can run this process to set how it works. If you doing web scraping or some other automation you can proceed from here.
Comparison of UiPath Attach Browser Vs Attach Window
When you read these activities, you will feel both are the same but they are small differences between these two activities. Both Attach Browser and Attach Window are used for web automation. Now we compare UiPath Attach Browser vs Attach Window:
| UiPath Attach Browser | UiPath Attach Window |
|---|---|
| This Attach Browser activity is mainly used for automating web browsers and web pages | This Attach Window activity is mainly used for automating any window applications |
| Allow you to choose the specific web browser which you wish to automate | It does not allow you to choose the specific web browser which you wish to automate |
| It allows you to specify the URL of the web page you want to open | Since attach window is not mainly focused on browsers you cannot specify the URL. |
| It is used in web browsers such as Chrome, Internet Explorer and Firefox | It used in any window application |
Properties of Attach Browser in UiPath
While using these activities, you may notice some properties of these activities shown on the right side of the studio. We will discuss each property in detail.
Package Used
In this activity the package used is :
UiPath.Core.Activities.BrowserScopeInput Properties
- Selector: It is used to find a specific Ui element when it is executed, which means the selector allows you to select the browser element. It is an XML that lists the characteristics of the GUI element you’re seeking and a few of its parents.
- BrowserType: This helps you to choose the browser which you want to select it may be Chrome, Firefox, Edge, or other browsers. It is also available for Custom browsers. We will explain these custom browsers after explaining the properties.
- Browser: The current browser variable to which you want to attach the browser.
- TimeoutMS: It specifies the time required to wait for an activity to run before an error occurs. The standard value is 30000 ms which is about 30 seconds.
Option Properties
- SearchScope: It specifies the application window where the UI element specified by the Selector
Output Properties
- UiBrowser: It gives the browser available, which means the selected browser variables.
Common Properties
Some of the common properties available in these activities are::
- DisplayName
- ContinueOnError
Custom Browser in UiPath
Custom browser is completely different from commonly used browsers such as chrome, firefox, edge, etc. These custom browsers are built based on chromium projects. UiPath mainly supports two custom browsers such as:
- Browsers built with CEF (Chromium Embedded Framework)
- Browsers built with the JxBrowser framework
These custom browsers can be used in automating by using WebDriver in your Uipath Studio
UiPath Attach Browser Not Working
While using this activity, some users may face a uipath attach browser missing problem. This is mainly due to two reasons: either you have not enabled classic activities or the package is missing. Just follow these steps to fix this problem, you can refer to the Attach Browser not working fix.
Conclusion
So far we have discussed about this activity and how to use this activity in uipath with help of an example, also we solved the problems while using these activities. You can also check other activities in detail through our tutorial series.
Also check, UiPath Official.
Faq on UiPath Attach Browser Activity
What does attach browser do in Uipath?
To attach a browser in uipath you can use the u0022Attach Browseru0022 activity in uipath studio. You can attach any one browser, in which you have installed the extension of Uipath.
How do I add a browser to Uipath?
To add a browser, you have to use browser activity which is available in UiPath studio. You can add browsers such as chrome, firefox, edge, and others browsers. You can also add a custom browser.
How do I open the browser activity in Uipath?u003cbru003e
To open the browser you have to use the u0022Attach Browseru0022 Activity in your uipath Studio. This activity allows you to select a browser in which you wish to automate your process.
