In this tutorial, you will learn UiPath’s other activity, UiPath Build DataTable Activity. In UiPath one of the most common processes is to create datatable for various purposes. So with the help of this activity, you can now create datatable easily in UiPath Studio.
So to learn in detail let’s go through it. Here we will provide in-depth knowledge of his activity so that you don’t need any doubt after learning this activity and how to use it in your automaton process.
Table of Contents
What is UiPath Build DataTable?
The UiPath Build DataTable activity is a powerful tool for creating a structured table with a defined schema. This activity is very beneficial when dealing with enormous data sets that need to be organized and analyzed. Users may adapt the table to match their individual requirements with a few clicks.
Build data table UiPath activity is used to create or build a data table in UiPath Studio. By default, you will provide two columns and if you want an additional column you can add it. The package Used in this activity is UiPath.Core.Activities.MessageBox.
How to Use Build Data Table in UiPath
Now that you have learned some basic knowledge about this activity, let’s check how you can use it on your UiPath Studio. Here we will provide a complete example of it working and displaying the data table which you have created using this activity in the message box.
- Open Your UiPath Studio and create a new process.
- On the Activity search bar search for the “Build Data Table” activity and double-click to add it to your workflow.

- Now Click on the “Data Table” button to create a new data table in this activity.
- A window will be popped where you can add, edit, Update, or delete rows and columns.
- By default in this activity there will be at least two columns but based on needs you can increase or decrease the number of columns and rows.
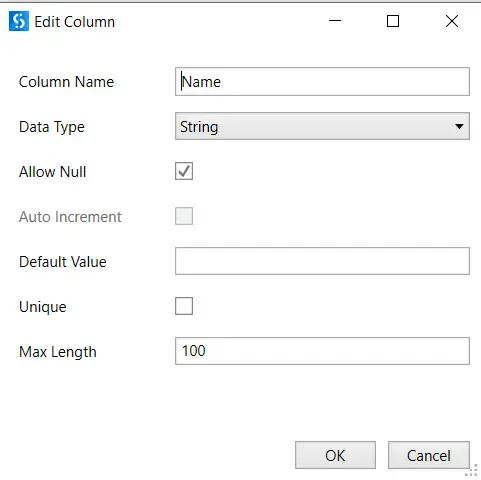
- Now to edit columns just click on the edit icon and give a name, datatype, length, etc.

- Column Name: It describes the name of the data table column which you want to create.
- Data Type: It specifies the data type of the values you are passing. Suppose you are creating a column “Age” then its data type will be an integer.
- Allow Null: If you turn this option on, then Null or empty values will be stored
- Auto Increment: If you turn this option on, then the values in the column will be automatically incremented by one whenever a new row is added or created. This option is only available if you set the data type as Int32.
- Default Value: It specifies the default value which you would like to add to all rows in this column.
- Unique: If you turn this option on, then all values adding the row in this column should be unique.
- Max Lenth: UiPath build data table max length describes the maximum characters in this column. If you set it as -1 then there will be no limit on the characters in the column. By default value is set to -1.
- After editing or adding new columns now you have to save your editions. To do that click on the OK button.

- After entering the values in the Build Data Table activity, Now In the Properties section you need to enter a Data Table variable name for keeping the output. You can create your own variable by using the short key Ctrl + K.
- Next, you need to add “Output Data Table activity” to convert the Data Table into a string. By default, the specific data type of the variable will be a data table so here to display it in a message box you have to convert it into a string, to do it we use this activity.
- Now in the Properties section of the Output Data Table activity, you will be adding the Input variable & Output variable for keeping the output as a string.
- After adding Output Data Table, you need to drag and drop the Message Box activity to display the data table output in a text message.
- Now in the Properties section of the Message Box activity, You need to enter the variable name. The variable must be the same as the variable that you have entered in Output Data Table Activity.

- Now run this process the data table will be visible in a message box in the form of a string.
Properties of UiPath Build DataTable Activity
Now let’s check the properties of this activity in detail.
| Properties | Descriptions |
|---|---|
| Output | ➊ DataTable: The name of the datatable where you want to store the data table which you have created using this activity |
| Common | ➊ DisplayName |
Conclusion
Now you have learned how to use the UiPath Data table with variables in detail. You can use the above steps to create a new data table in excel, you just need to write the created data table variable to an excel file. You can use this activity on various use cases depending on your automation needs.
Also, refer UiPath docs.
Faq on Build Data Table UiPath Activity
-
How to use build data table in uipath
To use a data table in UiPath Studio add the u0022Build Datatableu0022 activity and edit the columns and rows to create a table and save the data table to a variable.
-
How to build a data table in uipath
To build a data table in UiPath Studio you can use the u0022Build Data Tablu0022 activity and Enter the variable name to store the data table values in UiPath Studio.
