
In this Tutorial, you will learn about Add Data Row Activity in UIPath Studio. From the name itself, you can understand what is it about. This activity is used to add additional rows to the already existing datatable. This activity works similarly to Add Data Column activity.
So here you will be able to learn a detailed overview of this activity including how to use this activity with an example and the properties of this activity in detail. You can use this activity in both UiPath Studio and UiPath StudioX.
What is Add Data Row Activity in UiPath Studio
The “Add Data Row” Activity in UiPath Studio is an essential tool if you’re trying to automate a process where datatable manipulation is needed. With the help of this activity in uipath, you can rapidly add a new row to a particular DataTable in UiPath, which is used to store and manage data.
You need to provide an array of values with each element representing a value to be added to the new row in the DataTable to utilize the “Add Data Row” method. Moreover, you may indicate the point inside a DataRow in which a new row should be placed, or even replace an existing row at that location. The merging of two DataTables or adding new data to a database are two examples of how this operation may be very helpful for automating processes that involve data manipulation.
When dealing with huge data in UiPath Studio, the “Add Data Row” activity may help you save time and minimize the chance of mistakes that can occur from manual data handling. The package used in this activity is:
UiPath.Core.Activities.AddDataRowHow to Use UiPath Add Data Row Activity
- Open Your UiPath Studio and create a new process.
- To start with, drag and drop the “Build Datatable” activity onto the design panel in UiPath Studio. This activity is used to create a sample DataTable. Save the output into a variable called “Datatable_Output“.
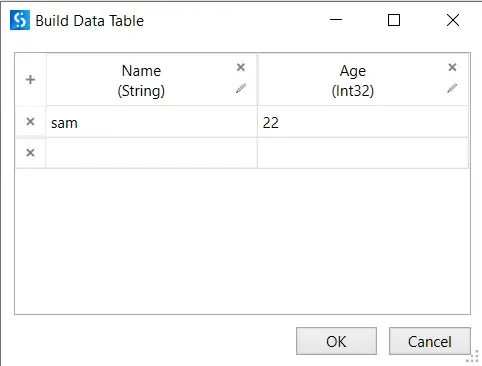
- Now, drag and drop the “Add Data Row” activity onto the design panel. In the properties window of this activity, specify the DataTable that you want to modify, in this case, “Datatable_Output“. You can also add the values in a row with help of an array in Datatable. For Example, if there exist two columns “Name” and “Age” then you can store {“Ram”,28} in array form which will be added to the datatable which you wish to.

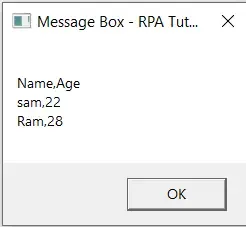
- Next, drag and drop the “Output Data Table” activity onto the design panel. Pass the modified DataTable “Datatable_Output” as input to this activity. The sole purpose of this activity is to convert the DataTable content into string type so that it can be displayed on the screen using a message box.
- Use the “Message Box” activity to display the updated DataTable. In the message box activity, you can use the output of the “Output Data Table” activity to display the contents of the DataTable.

- Finally, execute the workflow and observe the output carefully. You should be able to see the updated DataTable with the newly added row displayed on the screen.
These methods will help you utilize UiPath’s “Add Data Row” activity to correctly add new rows to an existing DataTable. With the help of this activity, you may quickly automate operations that call for data manipulation, which will save you time and effort.
Properties of Add Data Row UiPath Activity
As now you are familiar with the activity, now let’s check its properties section.
| Properties | Description |
|---|---|
| Input | ➊ ArrayRow: It specifies the array values which you want to add to your specific datatable. Make sure the data type of your row should match the column. ➋ DataRow: If you enter values into this text box then ArrayRow is not considered. ➌ DataTable: The name of the datatable where you want to add your row data. |
| Common | ➊ DisplayName |
Conclusion
As now you have learned Add data rows to a specific column uipath, you can use this on various use cases based on your needs. If you find any difficulty using this activity, you can ask in our comment section. With this activity, you can easily add new data rows to your existing data tables.
Also check, UiPath Docs.