In this tutorial, we are going to discuss another classic activity in uipath which is UiPath Find Element Activity. In selenium or RoboCop, you are using XPath to find elements that are not as easy and it’s time-consuming. In uipath, you can do it easily by using this activity. so let’s go through it.
The UiPath Find Element Activity is used to look for a certain UI element within a web page or desktop application and take action on it. To automate repetitive activities and boost productivity, you may interact with buttons, text boxes, drop-down menus, and other UI components using the UiPath Find Element Activity.
Table of Contents
What is UiPath Find Element Activity
From the name itself, you can understand what this activity is about. Still, I am giving a small intro about this activity. In selenium or RoboCop we are using XPath to find elements. So to find every element you have to copy its XPath. This method to find elements is not easy or convenient way. To overcome these difficulties UiPath has provided this activity.
This activity is used to find a specific or particular element. It can be a button or a search box in web automation. This activity is simple to use compared to the XPath method in RoboCop, as here you are only required to indicate the element on your screen. The package used in this activity is:
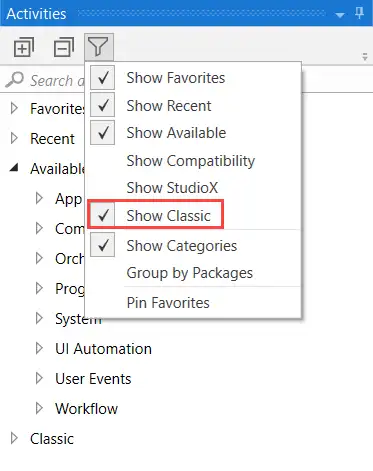
UiPath.Core.Activities.WaitUiElementAppearThis activity comes under classic activity, so to use this activity you have to enable classic activity. If you have not enabled this some time this activity may be missing.
How to Use Find Element Activity
As now you are familiarized with this activity, now we will check in detail how to use this activity in your automation process. You need to follow the below steps carefully.
- Open your UiPath Studio and create or use your existing process.
- Drag and drop a sequence activity to your workflow and make sure that you have enabled the classic activity

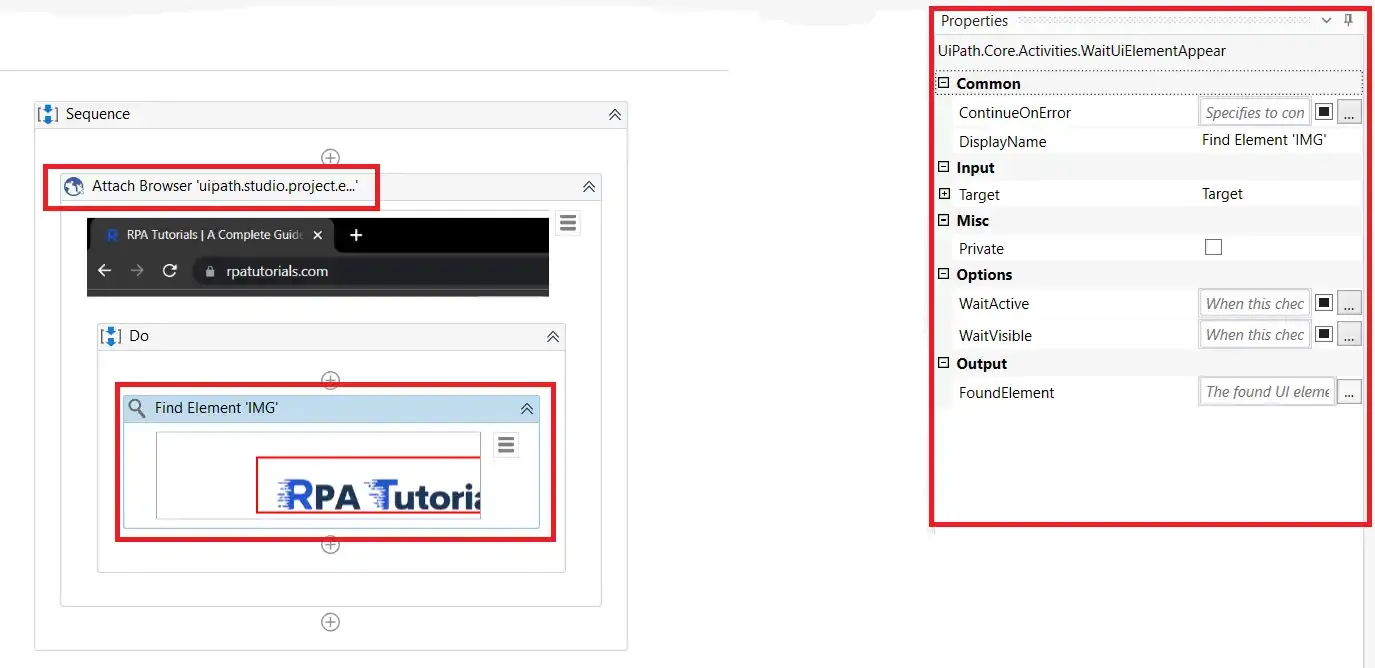
- To use this activity you will need a browser. so search for the “Attach Browser” Activity and drop it into your workflow.
- Now search for “Find Element” and add it to the attached browser activity of your workflow.

- Now click on the “indicate on screen” to select or find the element on your browser.

- Run the process to check how it’s working.
UiPath FInd Element Not Working Fix
This problem may occur due to not properly following the above steps. Still no problem, you can easily fix this problem by solving some of the issues. This is caused due to not enabling classic activity or due to lack of package.
Properties of UiPath Find Element
You can see the properties of each activity on the right side of your uipath studio when you click the activity. It provides information on the input and output of this activity. Let’s check the properties of this activity in detail.
| Properties | Description |
|---|---|
| Output | ➊ FoundElement |
| Options | ➊ WaitActive: When this option is enabled it waits for the specific UI element to become active ➋ WaitVisible: When this option is enabled it waits for the specific UI element to be visible |
| Common | ➊ ContinueOnError ➋ ContinueOnError |
Conclusion
Here we have given an overview of UIPath Find element activity, which waits for a particular or specific Ui element. You can use this activity easily from uipath activities.
Also check, UiPath
Faq on Find Element Activity
-
How to use find element activity in UiPath?
You can use this activity by adding this activity to your workflow in your uipath studio. To add this search in activities and double click to add it to your workflow.
