In this blog, we are discussing UiPath Move Window Activity. Here we will provide a detailed guide on this activity. In the end, we will also provide an example of how to use this activity so that you can understand it quickly.
Have you ever found yourself repeatedly alt-tabbing between many windows, attempting to line them all up perfectly? Perhaps you have a routine that requires you to manually resize and reposition windows on your screen. In either case, the Move Window activity Uipath is here to help! You may quickly automate these time-consuming manual operations with a few mouse clicks, saving you time and frustration.
Table of Contents
What is UiPath Move Window Activity

In this activity, Users can move, resize, and minimize or maximize windows on their system using the Move Window Activity UiPath. This activity is similar to other activities but in this activity, you can mention the dimension to move the window of your system. This activity can be used for automating tasks that require switching between windows or apps, and even addressing window alignment difficulties are all possible uses for this.
Users may quickly choose the required window, the preferred location or size, and the moving speed using the UiPath Move Window action, all with just a few clicks. Users can build more complicated automation flows that can optimize and streamline their workflows by fusing the Move Window activity UiPath with other actions like the Click or Type Into activities.
How to Use UiPath Move Window Example
Now we will check the uipath move window and how to use it, we have already mentioned the use of these activities in previous paragraphs. To use any activity on your UiPath Studio, firstly you have to install the studio. If you don’t know how to install you can refer to, UiPath Installation Guide. If you have already installed UiPath Studio, then follow the below steps:
- Open UiPath Studio Application and create a new project or use the existing project.
- Drag and drop the “Sequence Activity” to the main file in UiPath Studio.
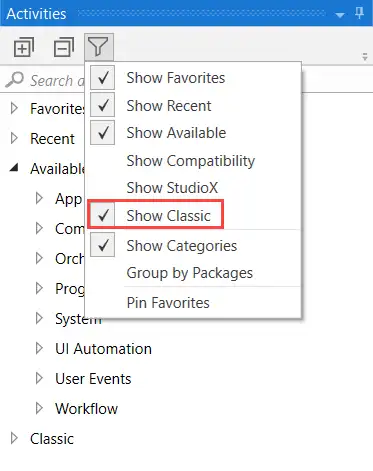
- To show this activity in your studio, you have to turn on “Show Classic“. To do this go to the activities section and click the filter icon and enable show classic to show all classic activities available in Uipath Studio.

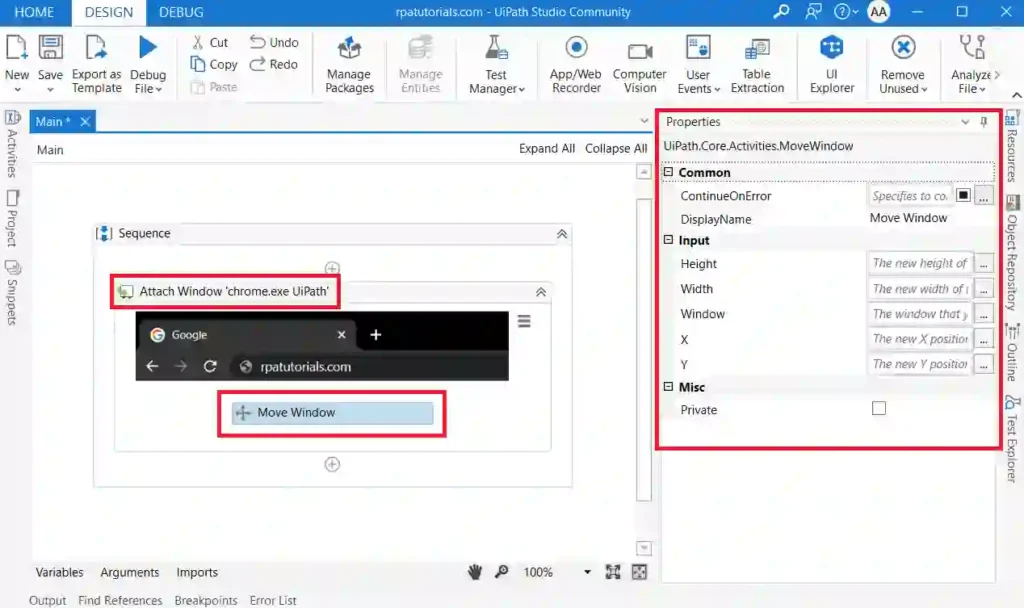
- Before using this activity, you should provide a window to enable this activity. To select an activity use the “Attach Window” activity to attach the window which you wish to use this move window activity
- After enabling classic activities in uipath studio, go to the search tab and search for ” Move Window“, then drag and drop this activity inside the sequence activity which you have created in the previous step.

- Give required properties to move or resize the preferred window such as height, width, and X and Y positions. You can see this activity’s properties by double-clicking on this activity. Properties are displayed on the right side of the screen.
Properties of Move Window Activity UiPath
As you are familiar with this property, when you click on move window activity uipath on the right side you can see some properties of this activity. Let’s explain each of the properties in detail:
Package Used
The package used in the move window activity is :
UiPath.Core.Activities.ShowWindowInput Properties
- X – It specifies the X position of the window. It only supports positive or negative values as in coordinates in mathematics
- Y – It specifies the Y position of the window. It only supports positive or negative values as in coordinates in mathematics
- Width – It specifies the width values of the window. It only supports positive or negative values
- Height – It specifies the height values of the window. It only supports positive or negative values
- Window – It supports only the window variable. It specifies the window which you wish to move or resize
Including input properties, there are also common properties available in this activity which are the properties that are present in almost all activities in uipath. Some of the common properties are:
- DisplayName
- ContinueOnError
Conclusion
We have included every penny detail of this activity here. we have defined how to use this activity, providing thorough instructions and examples. We’ve also talked about the various properties of the UiPath Move Window Activity, and how they may be used to personalize and fine-tune the window manipulation process.
For more details refer, UiPath Official
How To Use UiPath Move Window Activity
We have provided a detailed explanation including examples in the uipath move window how to use it. you can refer to this page to know it.
